Exercise 1 : Installing Windows Server 2008
Exercise 1 : Installing Windows Server 2008
In this section, you should be able to :
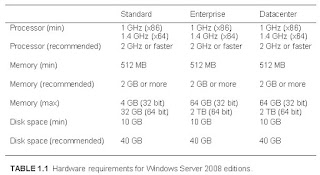
Table 1.1 lists the basic system requirements for Windows Server 2008 editions.
2.1. Click Next to continue.
3. Windows Server 2008 Setup
You are presented with options to Install, brief information about Server 2008 or repair (Figure 0002).
4. Product Key and Activation
10.1 Enter your "Product Key" for activation now or your can enter it later (Figure 0003).
4.2. Click Next to continue.
4.1. If you leave the product key box blank, the warning window will appear (Figure 0004); just click No to continue.
5. Windows Server Version
5.1. Select Windows Server 2008 Enterprise (Full Installation), (as shown in the Figure 0005).
 Figure 0005 : Windows Version
 Figure 0006 : Windows Server 2008 License Agreement
6.2. Click Next to continue.
7. Installation Options.
You are presented with options to Upgrade or Custom (advanced). Click Custom (advanced), (Figure 0007).
In this section, you should be able to :
- Describe the different editions of Server 2008
- Describe the requirements for a full installation
- Get a free evaluation copy of Windows Server 2008 (if you don’t already have one) and how to install it.
- Perform Full Installation of Server 2008
Table 1.1 lists the basic system requirements for Windows Server 2008 editions.

Hardware resources would need to be increased for any systems using Hyper-V technology and running virtual machines. For example, if you’re running three virtual servers within a Windows Server 2008 Enterprise edition, you would need additional processing power, more memory, and more disk space.
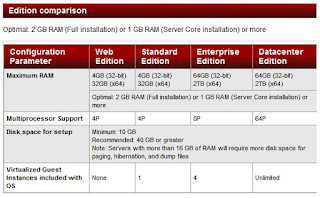
 For a detailed edition comparison, please visit the Microsoft Windows Server 2008 product page.
How to Obtain a Copy of Windows Server 2008?
It’s common for Microsoft to provide free evaluation copies of Server operating systems for use. Currently, you can download Windows Server 2008 30-day and 180-day evaluation editions free of charges at :
http://www.micosoft.com/windowsserver2008/en/us/trial-software.aspx
Beware, though. These files are quite large. If you’re using a slower dial-up link, you might want to see whether Microsoft is currently offering an evaluation DVD via regular mail. There’s a nominal cost involved with this option, but it’s better than trying to download more than 2GB at 56KB.
The download is an .iso image of the actual DVD. Search with your favorite search engine for Download Windows Server 2008, and you’ll find the link.
Once you download the .iso image, you can burn it to a DVD. If you don’t have the software needed to burn it to DVD, you can use one of many freeware utilities (such as ImgBurn) to burn the .iso image to your DVD.
EXERCISE 1.1 Installing Windows Server 2008
1. Insert the Windows Server 2008 DVD into your DVD drive. Boot your PC using Windows Server 2008 DVD.
2. Language and Keyboard Options.
This allows you to specify your language and your keyboard layout. By default, text input language and method is : US Keyboard layout (Figure 0001).
2.1. Click Next to continue.
3. Windows Server 2008 Setup
You are presented with options to Install, brief information about Server 2008 or repair (Figure 0002).
Figure 0002 : Windows Server 2008 Setup
3.1 Click Install now to start setup Windows Server 2008 on this computer. 4. Product Key and Activation
Figure 0003 : Product Key and Activation
10.1 Enter your "Product Key" for activation now or your can enter it later (Figure 0003).
4.2. Click Next to continue.
4.1. If you leave the product key box blank, the warning window will appear (Figure 0004); just click No to continue.
5. Windows Server Version
5.1. Select Windows Server 2008 Enterprise (Full Installation), (as shown in the Figure 0005).
 Figure 0005 : Windows Version
5.2. Tick the box of I have selected the edition of Windows that I purchased.
5.3. Click Next.
6. Windows Server 2008 License Agreement
6.1. Read the terms of the license agreement.
If you accept (which, of course, you have to do to continue installation), tick the box of I accept the license terms (Figure 0006).
5.3. Click Next.
6. Windows Server 2008 License Agreement
6.1. Read the terms of the license agreement.
If you accept (which, of course, you have to do to continue installation), tick the box of I accept the license terms (Figure 0006).
 Figure 0006 : Windows Server 2008 License Agreement
7. Installation Options.
You are presented with options to Upgrade or Custom (advanced). Click Custom (advanced), (Figure 0007).
8. Partition Options
8.1. Click Drive options (advanced), (Figure 0008).
8.2. Click New, (Figure 0009).
8.3. Change the size to 40,000 MB, (Figure 0010).
 Figure 0010 : Partition Size
Figure 0011 : Partition
 Figure 0012 : Installing Windows
 Figure 0013 : First time login
10.3 Once the password has been changed, the screen indicates success (Figure 0015). Click OK.
Summary
In this section you installed Windows Server 2008 on a computer. In the following exercises you will setting time zone, install Active Directory and other services, creating a small network for you to administer.
8.1. Click Drive options (advanced), (Figure 0008).
Figure 0008 : Drive options
8.2. Click New, (Figure 0009).
8.3. Change the size to 40,000 MB, (Figure 0010).
 Figure 0010 : Partition Size
Figure 0011 : Partition
8.6. Click Next. The partition will be formatted with NTFS as part of the installation. At this point, take a break. The installation will continue on its own (Figure 0012).
 Figure 0012 : Installing Windows
9. First Time Login
When you first time login, the windows warning will appear ask you to change the user password before logging on for the first time (Figure 0013).
When you first time login, the windows warning will appear ask you to change the user password before logging on for the first time (Figure 0013).
 Figure 0013 : First time login
9.1 Click OK.
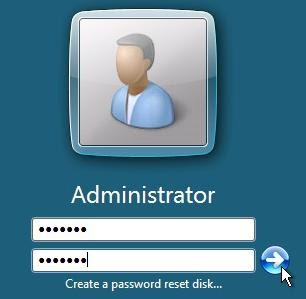
10. Change Administrator Password.
10.1 Enter a new password in the two test boxes (Figure 0014).
Enter Pr@ctice in this exercise. It meets complexity requirements and doesn’t require you to remember multiple passwords. Don’t use this password on a production server.
10. Change Administrator Password.
10.1 Enter a new password in the two test boxes (Figure 0014).
Enter Pr@ctice in this exercise. It meets complexity requirements and doesn’t require you to remember multiple passwords. Don’t use this password on a production server.
Figure 0015 : Password changed successfully
10.3 Once the password has been changed, the screen indicates success (Figure 0015). Click OK.
Congratulation! You have finish install the Windows Server 2008.
Summary
In this section you installed Windows Server 2008 on a computer. In the following exercises you will setting time zone, install Active Directory and other services, creating a small network for you to administer.


Comments
Post a Comment